Review of NovaBACKUP Professional 13.1
(Windows Backup Software for Laptops, PCs and Workstations)
Backup is needed in case of catastrophies/failures that may be physical, hard disk crash, system crash etc. It is of utmost importance to backup our crucial data online as well as offline. No business can afford to lose its data. Nor even an individual can afford to lost his data in any case. A lot of backup software are available, amongst which NovaBACKUP is one such backup and restore software. Today we will discuss about NovaBACKUP Professional 13.1 and see how it performs.
It can be downloaded from www.novastor.com and it comes with a 15 days trial version. Installation is easy and can be done following the steps shown in installation wizard.
NovaBACKUP is the windows backup software for Windows7 / vista / xp / 2003 users.
After installing, when we run it, we get the following screen:

NovaBACKUP Professional comes with two views : Simple view and Advanced view.
Simple View:
Simple view has basic options like Refresh My Backup, Backup, Restore, Disaster Recovery and Online Storage, it is meant for novice users who can work with this interface very easily by just a few clicks. The options are self-explanatory and the interface is quite simple.

Advanced View: The advanced view is for expert users that comes with a lot of options for advanced users. It has features like Smart select, Wizards for Backup, Restore, Copy, Disaster Recovery, an Online storage option and Utilities like Run job, Open job, Import media and update virus scanner.

My Documents: Check this box to backup My Documents folder.
Music: Check it to backup you music folder.
Email: Check it to backup outlook mails, backup does not require to close outlook for backup purpose, it works even if outlook is running.
Pictures: Click it to backup Pictures folder.
Select Job Type: Backup or Copy
Difference in Backup and Copy operation:
Copy is an exact duplicate of a file without involving any compression. It is merely a duplicate of a file from source to destination.
Backup image may or may not be compressed and has a certain file extension.
Copy:
1. Normal copy: It will copy files and directories from source to destination. It will not remove files on the destination that do not exist on the source.
2. Mirror copy: Mirror files and directories from source to destination and removes files on the destination that do not exist on the source.
3. Bi-directional copy: Copy files between the source and destination. Files existing on the destination will be copied back to source. To keep files consistent between source and destination, we should use Bi-directional copy.
Select Destination Directory:
Click on Run to start the backup process.

Backup:
Backup name may be specified, by default it is called My Backup. On the left side of the window, we get tree listing where in we may select what folders and files to backup.
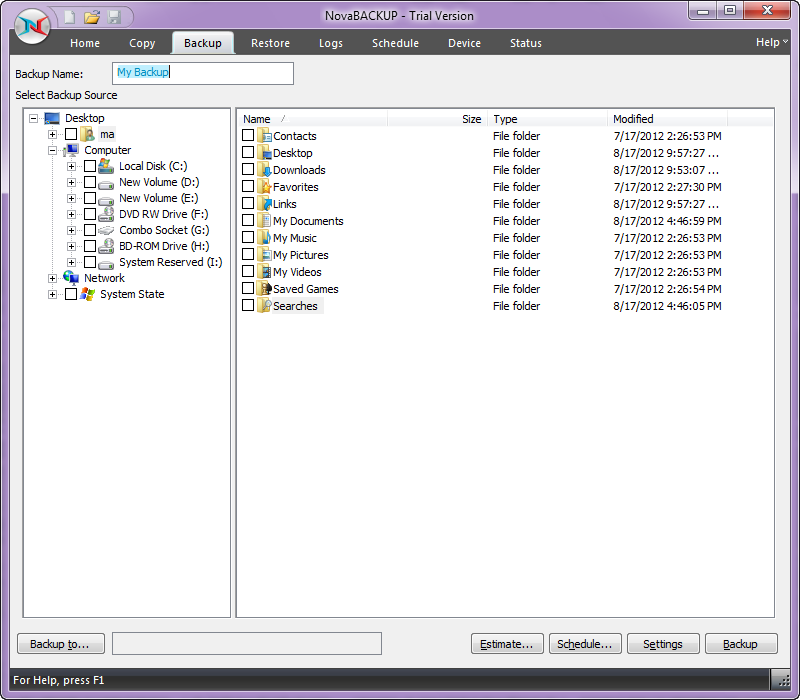
Estimate:
Estimate button at the bottom gives an overview of the count of Files, Directories, Size and Totals.

Schedule:
We can schedule the backup job as follows:

Backup to: Specifies the destination directory for backup.
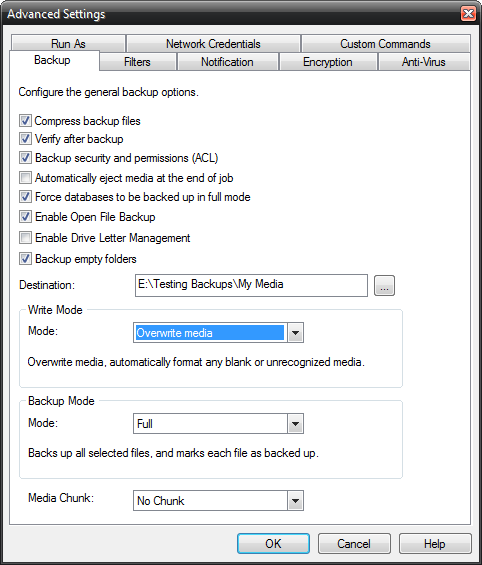
Settings: It contains various tabs such as Backup, Notification, Encryption, Anti-virus to name a few.
In Backup tab, we may choose to compress backup files, to verify after backup, backup empty folders, specify destination directory, choose backup mode as Full, Incremental, Differential, Snapshot and other features.
In Notification tab, we may choose Log creation settings and Notification options including Email notification.

In Encryption tab, it is by default None, but we may chose encryption from the given list. The files will be stored encrypted on the backup media, if we choose to encrypt.

In Anti-virus tab, we may enable or disable virus scanning. In case a virus is found, we may decide to skip it or to ignore it.

Restore: Restore tab provides the options to restore from the backed-up sessions. There are two ways – either to restore files by device or we can switch to Time mode.
Restore Files by Device:
The upper part of the window shows Media view that lists Disk Backups from which we can restore the data. Once we select a desired backup file to restore from it, in the bottom window, we get a tree listing of its contents. We can choose to restore all or selected files and folders. The entire restore process is quite simple, efficient and fast.

Settings:
Various types of Restore settings may be configured. We may choose to restore ACL file permissions and empty folders. We may also choose whether to overwrite files or not, or even to overwrite if files are older. We can select Restore location as original location or an alternate location. We can also do some settings for Database restores.

Notification may be defined for Restore operation also like it is done with Backup operation.

Logs: It gives a detailed listing of all logs for Backup and Restore operations and we can get further details per operation, by clicking on that log entry in the list.
Schedule: We can schedule the backups as per our need. Backup Retention button at the bottom of the Schedule screen, opens a dialog for different basic and advanced settings towards configuring backup retention.
Backup Retention:
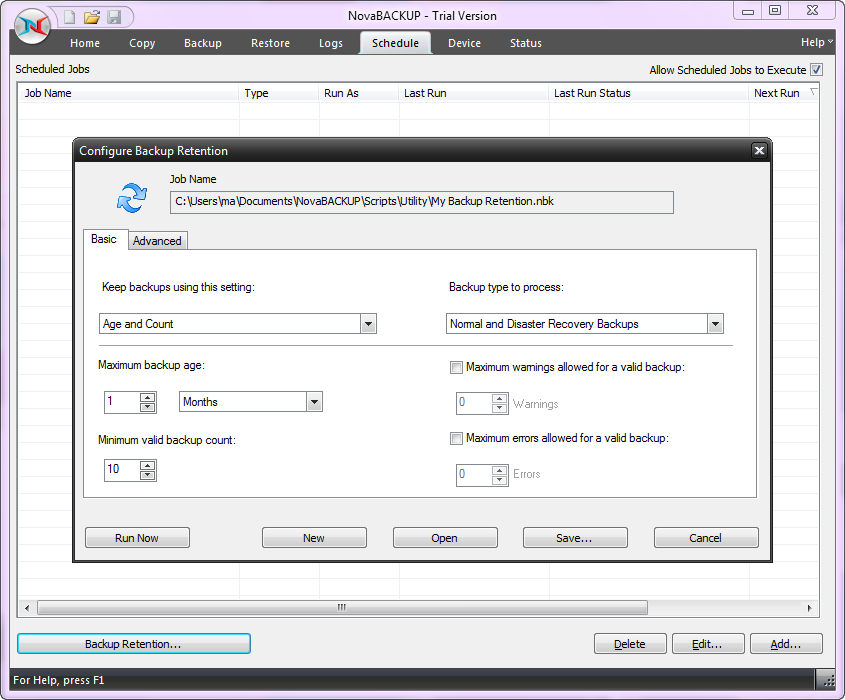
We can keep backups using two settings – Age, Count or Age and Count. Age is for configuring the maximum backup age.

Count is for specifying minimum valid backup count.

We can also specify Age and Count settings together. Some more advanced settings are also there for Disks and Tape.
Devices:
It gives a listing of all the available devices and provides an option to add an online device. In the following figure, I have added an Amazon S3 storage device.

NovaBACKUP provides an option for Offsite Backup Center that may be provided by NovaStor, Amazon or any FTP server also. We can configure these options quite easily using the interface provided by NovaBACKUP.

Delete: We can also delete the files from storage using this Delete option. It gives a tree listing of all the files in storage, we can select the files we want to delete and remove them from storage by clicking Delete button at the bottom of the screen.

Status: Status shows the progress of Backup and Restore operation.

Features:
- Connection available to free Amazon S3 storage
- Outlook backups
- Storage towards FTP server
- Antivirus scanning of backups
- Easy to install
- Easy to use
- Works on Windows XP, Windows 7 and Windows 2003
- Easy to use Backup and Restore Wizards
- Versioning control
- Provides Backup mode as well as Copy mode
- Backup scheduling and retention
If you like the review, try to test the software yourself to explore it in detail about its features and benefits.
Disclaimer:
We have made all efforts to provide accurate and relevant information. However, we cannot guarantee that there will be no errors. With respect to documents and information on the current and archived versions of our website, we do not make any warranty, expressed or implied, with respect to the documents available from my website. Additionally, we assume no legal liability for the accuracy, completeness, or usefulness of any information, product, or process disclosed herein and do not represent that use of such information, product, or process would not infringe on privately owned rights. This material is for information purposes only. If there are errors, we apologize now in advance. We suggest that you use the information as is and we exclude ourselves from any claims.