How to install VMware vSphere Hypervisor 5.5
vSphere Hypervisor 5.5 is available for download. It can be downloaded from:
| https://my.vmware.com/web/vmware/info/slug/datacenter_cloud_infrastructure/vmware_vsphere_hypervisor_esxi/5_5 |
After you have downloaded the hypervisor, follow the instructions give below to install it.
# Burn the downloaded file in a CD/DVD.
# Insert the CD and change bios settings towards boot from CD/DVD.
# Power on the machine and boot from CD/DVD. The following screen is shown:
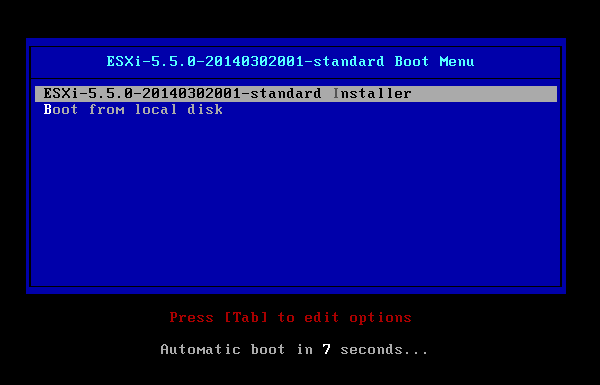
Select the first option: ESXi-5.5.0-20130302001-standard installer, if you are installing it from the CD/DVD, and if it has already been installed and CD/DVD is still in, then you need to select second option: Boot from local disk.
Since we are installing it for the first time, select the first option (default selected) and press enter key to continue. The following screen is shown.

Once the installer is loaded, the following screen is displayed. It shows information about ESXi release – VMware ESXi 5.5.0 (VMKernel Release Build 1623387), Processors and Memory information.

The progress bar indicates the progress until it is loaded completely. The following figure is another snapshot that shows its progress.

The following screen displays a confirmation that the systems shown in VMware’s Compatibility guide are the one’s that are supported by ESXi. The compatibility for hardware and software can be checked before its installation. The link is: http://www.vmware.com/resources/compatibility

Press Enter to continue. It will then start scanning for available devices as shown in figure below.

Once available devices are scanned, It shows the next screen for Disk selection. This server contains a local hard disk attached to it of 250GB. It is shown here under Storage Device, click on Enter to continue installing it on this device.

The next screen shows the options available to select keyboard layout. Click on US Default or the appropriate regional keyboard from the given list and press Enter to continue.

Next, it asks for root user password. Enter a root password with combination of alphabets, numbers and special characters and must be seven characters long.
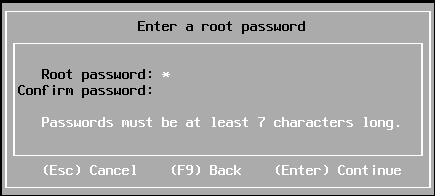
Once you enter the password and re-enter to confirm the password, you will get a message beneath it- Passwords match. Press Enter to continue.

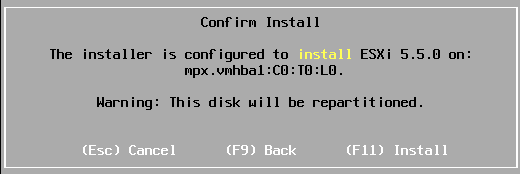
It displays a message : Scanning system… and will take a few seconds, and once scanning is done, it shows the next screen to confirm install.

The Confirm Install screen shows that the installer is configured on the shown Disk and gives a warning that the disk will be repartitioned. To confirm the installation, press F11 key.
It starts the installation and its progress can be seen using the progress bar as shown below.

Another screenshot to show the installation progress, when it reached 65%.

Once the installation is done, it shows the following screen, Installation Complete. In the description it specifies that this installation is a trial/evaluation mode for 60 days. You need to register it for full version of this product. When you download the ISO image from the link given above, it already provides you with a free license key, that should be used to register it. You don’t have to wait for 60 days to register it. The moment, you install it, you will get a license key for registering it.
Remove the CD/DVD from the drive and reboot.

It shows the following screen: Rebooting Server.

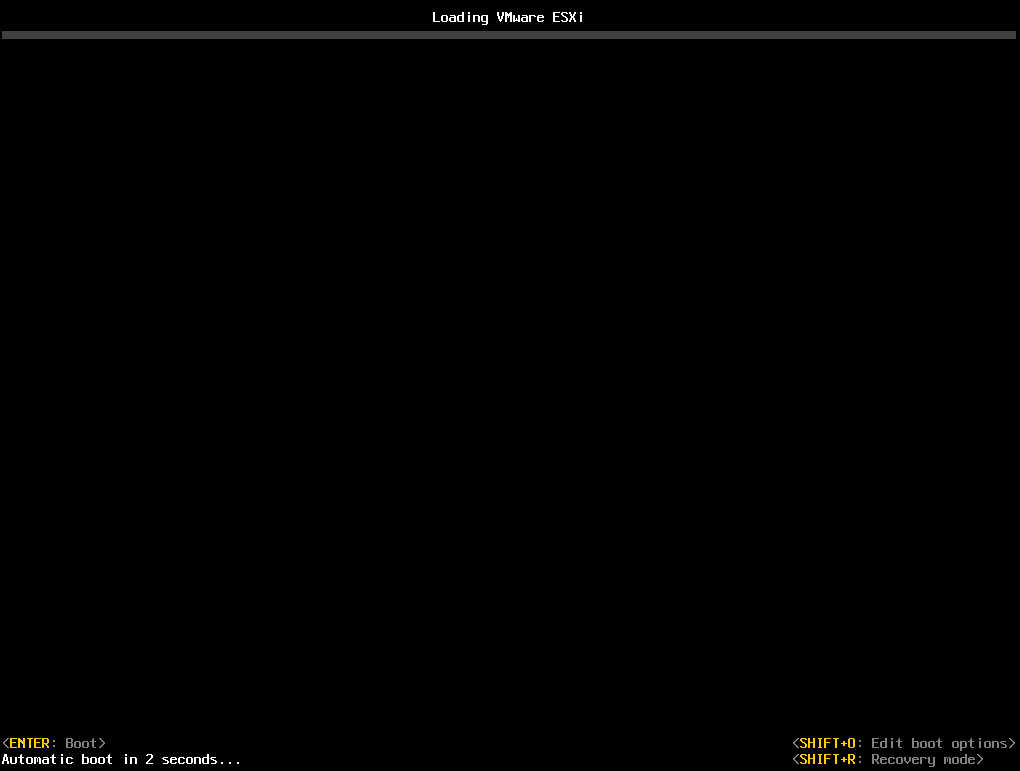
When the server starts booting from the disk, you will see the following screen. It shows Loading VMware ESXi screen. At the bottom left you will see <Enter: Boot> option, it means, press Enter key to boot the server. Another message below it is: Automatic boot in n seconds… , which means that the server will boot automatically after n seconds, if you don’t press Enter key.
On the bottom right corner, you will see two key-combinations. SHIFT+O and SHIFT+R. SHIFT+O is used to edit the boot options and SHIFT+R is used to enter in Recovery mode. Press enter to continue.
The server starts booting and the following screen is shown:

Another screenshot is shown below to show its progress.

Once the server is up, press F2 function key, it authenticates by shown the login screen as shown below:
Enter login name as root and password that you have specified during installation and press Enter key to continue. The following screen is shown:
You need to configure the network first. Click on Configure Management Network option and the following screen is shown.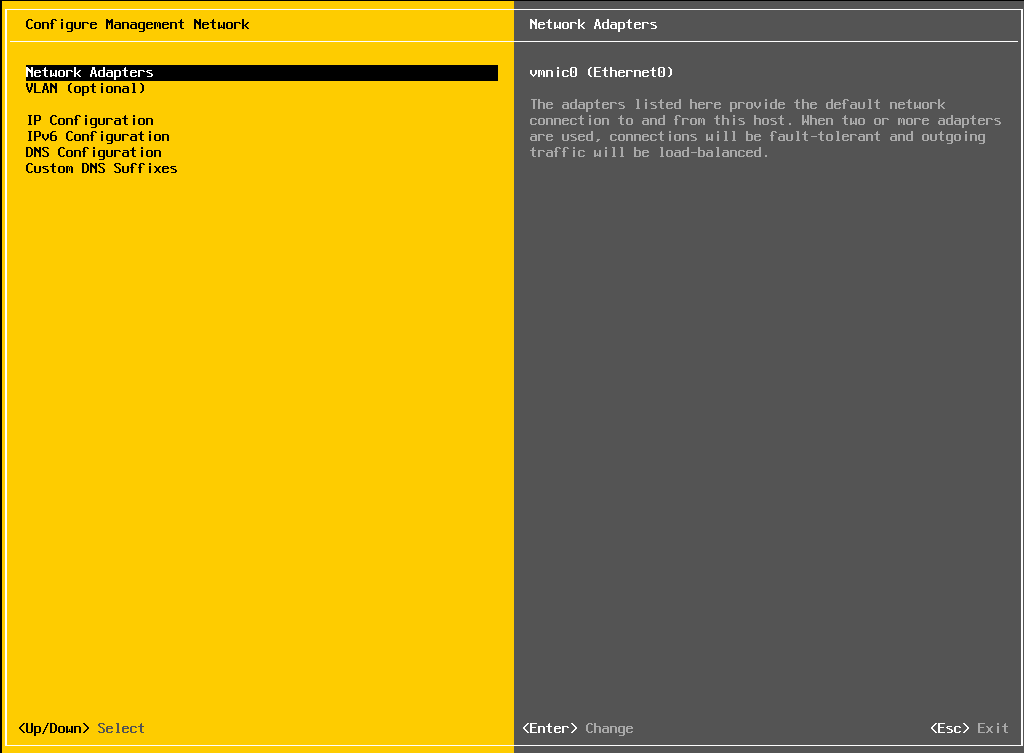
Click on IP configuration, when you get the option to chose between DHCP and Static IP address. Select: Set static IP address and network configuration and give the IP Address, Subnet Mask and Default Gateway. If you don’t have any, you need to consult your Network Administrator.
Select IPv6 option and the following screen is shown. You may select or de-select IPv6 depending on what network settings are available, you may need to contact your Network Administrator for the same. If you want to disable IPv6, uncheck the option: Enable IPv6 as shown below.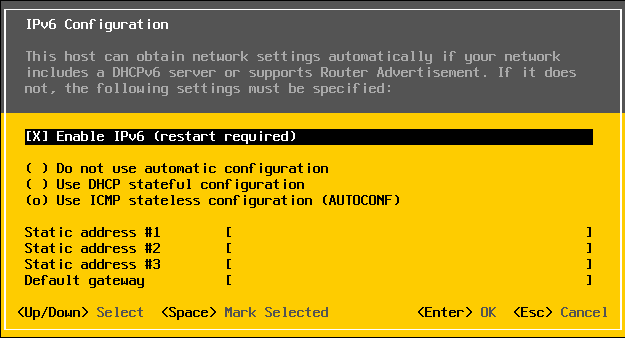
Under DNS configuration, set the DNS servers and the Hostname for your server. The Primary DNS server, Alternate DNS server and Hostname may be given as shown in the figure below.
To specify any custom DNS suffixes, you may enter them here as shown below:
To save the changes, press Y to apply changes and restart management network.
Once you are done, the server will be on the given network and you can start using it. To access it, you need VMware Infrastructure Client that can be downloaded from the following link:
https://my.vmware.com/web/vmware/details?productId=352&downloadGroup=ESXI550